Introduction

Denops
(/ˈdiːnoʊps/, pronounced
as dee-nops) is an ecosystem designed for developing plugins for Vim and
Neovim using Deno (a TypeScript / JavaScript runtime).
Denops and Denops plugins (Vim plugins powered by Denops) offer the following features:
- Installable as a Vim plugin:
Denops follows the standard Vim plugin architecture. Users can install Denops itself and Denops plugins using a Vim plugin manager, just like any other Vim plugins. - Unified codebase for Vim and Neovim:
Denops provides a unified API for both Vim and Neovim. You can write a plugin that functions on both Vim and Neovim with a single codebase. - Modern dependency management:
Deno's built-in dependency system with import maps provides clean, maintainable dependency management. The workspace configuration ensures each plugin's dependencies are isolated, preventing conflicts when multiple Denops plugins are installed together. - Simple and efficient code:
Deno utilizes the V8 engine, significantly faster than Vim script. You can write a plugin with straightforward code, without the need for complex optimizations solely for performance. - Risk-free execution:
Denops plugins run in a separate process from Vim / Neovim. Even if a plugin freezes, Vim / Neovim remains unaffected.
Check out vim-denops GitHub Topics to discover Vim plugins using Denops.
Denops is primarily developed and maintained by the vim-denops organization (separated from the vim-jp organization). For questions, you can use GitHub Discussions (English), or visit the #tech-denops channel on Slack workspace for vim-jp (Japanese).
Installation
Prerequisites
Denops requires Deno to be installed on your system. Please refer to Deno's official manual for installation instructions.
After installing Deno, ensure that the deno command is accessible from your
Vim.
:echo execpath("deno")
It should display the path to the deno command. If it prints an empty string,
add the path to the deno command to your PATH environment variable.
tip
If you prefer not to modify the PATH environment variable, you can set the
executable path to the g:denops#deno variable in your vimrc file like
this:
let g:denops#deno = "/path/to/deno"
Installation
Denops itself is a Vim plugin and can be installed using a Vim plugin manager, similar to other Vim plugins.
vim-plug
Plug 'vim-denops/denops.vim'
Jetpack.vim
Jetpack 'vim-denops/denops.vim'
dein.vim
call dein#add('vim-denops/denops.vim')
minpac
call minpac#add('vim-denops/denops.vim')
lazy.nvim
require("lazy").setup({
  "vim-denops/denops.vim",
  -- ...
})
Health Check
Denops provides a health checker to confirm that Denops is installed correctly.
You can check the health of Denops by running the :checkhealth command
(Neovim) or :CheckHealth (Vim with vim-healthcheck).
==============================================================================
denops: health#denops#check

- Supported Deno version: `1.45.0`
- Detected Deno version: `1.45.4`
- OK Deno version check: passed
- Supported Neovim version: `0.10.0`
- Detected Neovim version: `0.10.0`
- OK Neovim version check: passed
- Denops status: `running`
- OK Denops status check: passed
Getting Started
Denops (/ˈdiːnoʊps/,
pronounced dee-nops) is an ecosystem for Vim / Neovim that empowers
developers to write plugins in TypeScript / JavaScript powered by Deno.
Let's start by creating a simple plugin to learn how to develop Denops plugins.
Create a Plugin
Create a directory named denops-getting-started in your home directory and a
file named main.ts within it, under denops/denops-getting-started/:
$HOME
└── denops-getting-started
    └── denops
        └── denops-getting-started
            └── main.ts
Next, write the following TypeScript code in main.ts:
import type { Entrypoint } from "jsr:@denops/std@^8.0.0";

export const main: Entrypoint = (denops) => {
  denops.dispatcher = {
    async hello() {
      await denops.cmd(`echo "Hello, Denops!"`);
    },
  };
};
note
This example uses direct URL imports for simplicity. The recommended approach
for managing dependencies is to use deno.jsonc with import maps, which
you'll learn about in the tutorials.
Activate the Plugin
Add the following line to your Vim or Neovim configuration file (e.g.,
~/.vimrc or ~/.config/nvim/init.vim):
set runtimepath+=~/denops-getting-started
Or Neovim Lua configuration file (e.g., ~/.config/nvim/init.lua):
vim.opt.runtimepath:append("~/denops-getting-started")
Try the Plugin
Restart Vim/Neovim and execute the following command:
:call denops#request('denops-getting-started', 'hello', [])
You should see "Hello, Denops!" displayed on the screen like:

Explanation of the Getting Started
In this section, we'll provide detailed information about the Getting Started. If you find it too detailed, feel free to skip this section and move on to the next chapter, especially if your goal is to start developing a Denops plugin promptly.
What is Denops?
Denops claims to be an ecosystem for developing Vim / Neovim (hereafter, when we refer to Vim without restriction, we also include Neovim) plugins using Deno, but, in reality, it is a Vim plugin with the following features:
- Detection and registration of Denops plugins
- Launching and connecting to Deno processes
- Calling Deno process-side functions from Vim via RPC (Remote Procedure Call)
- Calling Vim features from Deno process-side via RPC
By utilizing this plugin, you can control Vim from code written in TypeScript (Denops plugins).
note
RPC (Remote Procedure Call) is used, and while Vim uses a JSON-based custom specification, Neovim uses MessagePack-RPC (a slightly modified specification). However, Denops abstracts away these differences, so Denops plugin developers don't need to be aware of the RPC specification differences between Vim and Neovim.
What is a Vim Plugin?
When Vim starts, it searches for files named plugin/*.vim in directories
specified in runtimepath. Additionally, if a function like foo#bar#hoge() is
called, it searches for files named autoload/foo/bar.vim in the runtimepath
and reads the file, calling the foo#bar#hoge() function defined within.
A Vim plugin is a set of predefined features provided to users, utilizing the
functionality mentioned above. Typically, an entry point is defined in
plugin/{plugin_name}.vim, and detailed features are implemented in
autoload/{plugin_name}.vim or autoload/{plugin_name}/*.vim. For example,
here is the directory structure for a Vim plugin named hello:
vim-hello
├── autoload
│    └── hello.vim # Defines the function `hello#hello()`
└── plugin
     └── hello.vim # Defines the `Hello` command
note
For more detailed information on creating Vim plugins, refer to
:help write-plugin.
What is a Denops Plugin?
When Denops is installed, in addition to Vim plugins, files named
denops/*/main.ts are also searched when Vim starts. If a corresponding file is
found, Denops registers the parent directory name (foo in the case of
denops/foo/main.ts) as the plugin name. Then, it imports the corresponding
file as a TypeScript module and calls the function named main.
A Denops plugin, similar to a Vim plugin, provides a set of features written in
TypeScript to users. Since Denops plugins typically include both TypeScript and
Vim script code, the directory structure looks like an extension of the Vim
plugin structure with an added denops directory. For example, here is the
directory structure for a Denops plugin named hello:
denops-hello
├── autoload
│    └── hello.vim # Tasks better written in Vim script (may not exist)
├── denops
│    └── hello
│           └── main.ts # Entry point for the Denops plugin (mandatory)
└── plugin
     └── hello.vim # Entry point written in Vim script (optional)
In the Getting Started, we created a file named
denops/denops-getting-started/main.ts and added its parent directory
(denops-getting-started) to runtimepath. There were no autoload or
plugin directories because we didn't provide an entry point that Vim could
easily call.
Understanding the Code in Getting Started
In the Getting Started, we wrote the following code in the main.ts file:
import type { Entrypoint } from "jsr:@denops/std@^8.0.0";

export const main: Entrypoint = (denops) => {
  denops.dispatcher = {
    async hello() {
      await denops.cmd(`echo "Hello, Denops!"`);
    },
  };
};
Let's break down this code step by step.
About Imports
import type { Entrypoint } from "jsr:@denops/std@^8.0.0";
The first line imports the Entrypoint type from the @denops/std standard
library. You can find detailed information about the library by checking the
URL: https://jsr.io/@denops/std@7.0.0 (replace jsr: to https://jsr.io/).
We fixed the version in the import URL, so it's recommended to check for details
and update to the latest version URL.
Note that we use import type syntax, which is part of TypeScript's
Type-Only Imports and Export.
This syntax can be written as import { type Entrypoint } with the same
meaning. Using import { Entrypoint } for a type-only import is also valid.
note
Denops plugins are dynamically imported, so there might be differences in
Denops versions between development and usage. Therefore, to minimize
differences between Denops versions, only type information is exposed. The
implementation can be found in
denops/@denops-private/denops.ts,
but it is not publicly exposed for the reasons mentioned above.
This type information is provided by @denops/core, and @denops/std simply re-exports the type information from @denops/core. However, @denops/core is intended to be referenced only by denops.vim and @denops/std, so Denops plugin developers don't need to use it directly.
About Entry Point
export const main: Entrypoint = (denops) => {
  // Omitted...
};
The above code exports the main function. The main function is called by
Denops, and it takes the
Denops instance (denops) as an
argument. Denops plugins use this denops to add user-defined APIs or call
Vim's features.
About User-Defined APIs
denops.dispatcher = {
  async hello() {
    // Omitted...
  },
};
The code above adds a user-defined API named hello to denops.dispatcher.
denops.dispatcher is defined as follows, and each method takes unknown types
for both arguments and return values:
interface Dispatcher {
  [key: string]: (...args: unknown[]) => unknown;
}
By defining methods in denops.dispatcher, you can freely define APIs. Since
the methods registered in denops.dispatcher are always called with await,
you can make them asynchronous by returning a Promise.
The methods defined in denops.dispatcher can be called from Vim using the
following functions:
| Function | Description |
|---|---|
denops#request | Synchronously calls a user-defined API and returns the result. |
denops#request_async | Asynchronously calls a user-defined API and passes the result to callbacks. |
denops#notify | Calls a user-defined API without waiting for completion and discards the result. |
At the end of the Getting Started, we used
denops#request('denops-getting-started', 'hello', []) to call the user-defined
API named hello in denops-getting-started plugin.
About Calling Vim's features
await denops.cmd(`echo "Hello, Denops!"`);
With the received denops, you can call Vim functions, execute Vim commands, or
evaluate Vim expressions. In the example above, the hello API internally uses
denops.cmd to execute the echo command in Vim. The denops object provides
several methods:
| Method | Description |
|---|---|
call | Calls a Vim function and returns the result. |
batch | Calls multiple Vim functions in bulk and returns the results in bulk. |
cmd | Executes a Vim command. If ctx is provided, it is expanded as local variables. |
eval | Evaluate a Vim expression and returns the result. If ctx is provided, it is expanded as local variables. |
dispatch | Calls a user-defined API of another Denops plugin and returns the result. |
Although denops provides low-level interfaces, @denops/std combines these
low-level interfaces to offer higher-level interfaces. Therefore, it's
recommended to use @denops/std to call Vim's features in actual plugin
development.
For example, use
function module to call
Vim's function instead of denops.call like:
import * as fn from "jsr:@denops/std@^8.0.0/function";

// Bad (result1 is `unknown`)
const result1 = await denops.call("expand", "%");

// Good (result2 is `string`)
const result2 = await fn.expand(denops, "%");
If developers use function module instead, they can benefit from features like
auto-completion and type checking provided by LSP (Language Server Protocol).
Next Steps
In the next step, follow the tutorial to learn how to develop a minimum Denops plugin.
Tutorial: Hello World
In this chapter, we will create a minimal Denops plugin that greets the user. Most of the code resembles the previous Getting Started, so feel free to skip this chapter if you are already familiar with it.
note
The plugin we will create in this section can be found at https://github.com/vim-denops/denops-helloworld.vim
Creating a Minimal Vim Plugin
Let's start by crafting a minimal Vim plugin called denops-helloworld.
Create a directory named denops-helloworld in your home directory and a Vim
script file as follows:
denops-helloworld
└── plugin
     └── denops-helloworld.vim
The content of the plugin/denops-helloworld.vim file is as follows:
if exists('g:loaded_denops_helloworld')
  finish
endif
let g:loaded_denops_helloworld = 1

command! DenopsHello echo 'Hello, Denops!'
The initial four lines (as shown below) serve as a guard, preventing the plugin from being loaded more than once. Using this guard is a common practice to ensure the plugin is loaded only once.
if exists('g:loaded_denops_helloworld')
  finish
endif
let g:loaded_denops_helloworld = 1
The final line (as displayed below) defines a command named DenopsHello that
invokes the echo 'Hello, Denops!' command. Thus, when you execute
:DenopsHello in Vim, it will display "Hello, Denops!".
command! DenopsHello echo 'Hello, Denops!'
Upon startup, Vim searches and loads files named plugin/*.vim in directories
specified in runtimepath. To activate the plugin, add the following line to
your Vim configuration file (e.g., ~/.vimrc or ~/.config/nvim/init.vim):
set runtimepath+=~/denops-helloworld
For Neovim's Lua configuration file (e.g., ~/.config/nvim/init.lua), use:
vim.opt.runtimepath:append("~/denops-helloworld")
Restart Vim and execute :DenopsHello to witness the message "Hello, Denops!".

Creating a Minimal Denops Plugin
When denops.vim is installed, it searches for files named denops/*/main.ts
in addition to Vim plugins when Vim starts.
If a corresponding file is found, Denops registers the parent directory name
(foo in the case of denops/foo/main.ts) as the plugin name. It then imports
the corresponding file as a TypeScript module and calls the function named
main.
note
Denops plugins typically include both TypeScript and Vim script code, so the
directory structure looks like an extension of the Vim plugin structure with
an added denops directory.
Let's add denops/denops-helloworld/main.ts to the denops-helloworld
directory that we created in the previous section. The directory tree will be as
follows:
denops-helloworld
├── denops
│    └── denops-helloworld
│           └── main.ts
└── plugin
     └── denops-helloworld.vim
Here is the content of the denops/denops-helloworld/main.ts file:
import type { Entrypoint } from "jsr:@denops/std@^8.0.0";

export const main: Entrypoint = (denops) => {
  console.log("Hello, Denops from TypeScript!");
};
warning
As shown above, developers can use console.log (or console.warn,
console.error, etc.) for debug output. The content will be echoed to Vim.
However, it is not recommended to use console.log in production code.
Instead, use denops.cmd("echo '...'") or the echo function in the helper
module of the @denops/std library.
Once you've created the file, restart Vim, and "Hello, Denops from TypeScript!" will be displayed on Vim startup.

Adding Denops API to the Plugin
In the previous section, we created a minimal Denops plugin. In this section, we will enhance the plugin by adding an API.
Open denops/denops-helloworld/main.ts and rewrite the content with the
following code:
import type { Entrypoint } from "jsr:@denops/std@^8.0.0";
import { assert, is } from "jsr:@core/unknownutil@^4.3.0";

export const main: Entrypoint = (denops) => {
  denops.dispatcher = {
    hello(name) {
      assert(name, is.String);
      return `Hello, ${name || "Denops"}!`;
    },
  };
};
The above code adds a new API hello to the plugin. The hello API takes a
string name and returns a greeting message. See
About User-Defined APIs in Explanation of the Getting started
for details about User-Defined APIs.
note
While Vim script does not facilitate types, Denops uses unknown types on the
interface between Vim and Denops. That's why we use
unknownutil to ensure that the name is
of type string in the above code.
Once you've updated the file, restart Vim, and execute the following command, you will see the message "Hello, Your name!".
:echo denops#request("denops-helloworld", "hello", ["Your name"])
As shown, users can call the Denops API via the denops#request() function.

Calling Vim Features from the Plugin
If you want to use a Vim feature from your Denops plugin, you can call it via
the denops instance passed to the plugin's main function. You can rewrite
main.ts as follows to register the DenopsHello as a Vim command:
import type { Entrypoint } from "jsr:@denops/std@^8.0.0";
import { assert, is } from "jsr:@core/unknownutil@^4.3.0";

export const main: Entrypoint = (denops) => {
  denops.dispatcher = {
    async init() {
      // This is just an example.
      // Developers usually should define commands directly in Vim script.
      await denops.cmd(
        `command! -nargs=? DenopsHello echomsg denops#request('denops-helloworld', 'hello', [<q-args>])`,
      );
    },

    hello(name) {
      assert(name, is.String);
      return `Hello, ${name || "Denops"}!`;
    },
  };
};
Then, rewrite plugin/denops-helloworld.vim to automatically call the init
API on plugin load via the DenopsPluginPost:{plugin_name} autocmd:
if exists('g:loaded_denops_helloworld')
  finish
endif
let g:loaded_denops_helloworld = 1

augroup denops_helloworld
  autocmd!
  autocmd User DenopsPluginPost:denops-helloworld
      \ call denops#notify('denops-helloworld', 'init', [])
augroup END
Once Vim is restarted, the DenopsHello command will be registered.
Then you can run:
:DenopsHello Your name
If the plugin has been registered successfully, you will see Hello, Your name!
as a result.

Next Steps
Learn about managing dependencies with import maps for cleaner code:
Or jump to the maze tutorial to learn more advanced concepts:
Managing Dependencies with Import Maps
In the previous examples, we used direct URL imports like
jsr:@denops/std@^8.0.0. While this works, the recommended approach for Denops
plugins (v8.0.0+) is to use import maps with deno.jsonc for cleaner and more
maintainable dependency management.
Why Use Import Maps?
The main reason to use import maps is to avoid conflicts between multiple Denops
plugins. Each Denops plugin must have a unique directory name under denops/,
but root-level configuration files could potentially conflict:
# Multiple plugins installed:
~/.vim/pack/plugins/start/plugin-a/
├── deno.jsonc              # Could conflict
└── denops/plugin-a/        # Always unique

~/.vim/pack/plugins/start/plugin-b/
├── deno.jsonc              # Could conflict
└── denops/plugin-b/        # Always unique
Some plugin managers have a "merge" feature that combines plugin directories,
but even without merging, placing configuration files in plugin-specific
directories (denops/plugin-name/) ensures no conflicts can occur regardless of
how plugins are installed or managed.
Setting Up Your Plugin Structure
Update your denops-helloworld structure to include configuration files:
denops-helloworld/
├── deno.jsonc                    # Development configuration
├── denops/
│   └── denops-helloworld/
│       ├── deno.jsonc           # Runtime dependencies
│       └── main.ts
└── plugin/
    └── denops-helloworld.vim
Root deno.jsonc (Development)
Create a deno.jsonc in your repository root for workspace configuration:
{
  "workspace": [
    "./denops/denops-helloworld"
  ]
}
This enables Deno commands like deno fmt, deno lint, and deno test to work
from your project root and discover your plugin's configuration.
Plugin deno.jsonc (Runtime)
Create denops/denops-helloworld/deno.jsonc for runtime dependencies:
{
  "imports": {
    "@denops/std": "jsr:@denops/std@^8.0.0",
    "@core/unknownutil": "jsr:@core/unknownutil@^4.3.0"
  }
}
Updating Your Code
With import maps configured, update your imports from:
import type { Entrypoint } from "jsr:@denops/std@^8.0.0";
import { assert, is } from "jsr:@core/unknownutil@^4.3.0";
To cleaner versions:
import type { Entrypoint } from "@denops/std";
import { assert, is } from "@core/unknownutil";
Alternative: import_map.json
Denops also supports import_map.json(c) files, but they require more verbose
configuration due to the
Import Maps Standard:
// denops/denops-helloworld/import_map.json
{
  "imports": {
    "@denops/std": "jsr:@denops/std@^8.0.0",
    "@denops/std/": "jsr:/@denops/std@^8.0.0/" // Required for submodules
  }
}
We recommend using deno.jsonc as it's less verbose and integrates better with
Deno tooling. For more details about the differences, see the
Deno documentation.
important
Import map features require Denops v8.0.0 or later. For older versions, continue using direct URL imports.
Benefits
- Cleaner imports: No more long URLs in your code
- Version management: Update dependencies in one place
- Better IDE support: Auto-completion and type checking work seamlessly
- No conflicts: Each plugin manages its own dependencies
- Development tools: Format and lint your code from the project root
Tutorial (Maze)
Now that you have grasped the basics of developing Denops plugins in the previous chapters, it's time to delve into creating a more functional plugin.
So, out of the blue, have you ever felt the urge to solve mazes while programming? Personally, I haven't, but there might be enthusiasts who enjoy it immensely. In any case, let's embark on developing a Denops plugin that can generate and display a maze in Vim at any time. Well, don't ask me why we would want to do that.
note
The plugin we will create in this chapter can be found at https://github.com/vim-denops/denops-maze.vim
Utilizing Third-Party Library
Certainly, starting with coding a maze generation algorithm would be nice.
However, since you're now using Deno, you can conveniently employ a third-party
library called maze_generator.
Let's define a Maze command similar to DenopsHello; Maze generates a maze
and outputs it.
note
The maze_generator library is a third-party library that generates a maze.
It is not a part of Deno or Denops. You can use any third-party library that
is compatible with Deno in your Denops plugin. Thanks to Deno, developers and
users don't need to worry about the installation of third-party libraries.
Deno automatically downloads and caches the library when it is imported.
Create the denops-maze plugin and place it under ~/denops-maze. The
directory tree will look like this:
~/denops-maze
├── deno.jsonc
├── denops
│    └── denops-maze
│           ├── deno.jsonc
│           └── main.ts
└── plugin
     └── denops-maze.vim
First, create the root deno.jsonc file for workspace configuration:
{
  "workspace": [
    "./denops/denops-maze"
  ]
}
Then, create the denops/denops-maze/deno.jsonc file for runtime dependencies:
{
  "imports": {
    "@denops/std": "jsr:@denops/std@^8.0.0",
    "maze_generator": "npm:@thewizardbear/maze_generator@^0.4.0"
  }
}
The content of the denops/denops-maze/main.ts file will be:
import type { Entrypoint } from "@denops/std";
import { Maze } from "maze_generator";

export const main: Entrypoint = (denops) => {
  denops.dispatcher = {
    maze() {
      const maze = new Maze({}).generate();
      const content = maze.getString();
      console.log(content);
    },
  };
};
The content of the plugin/denops-maze.vim file will be:
if exists('g:loaded_denops_maze')
  finish
endif
let g:loaded_denops_maze = 1

" Function called once the plugin is loaded
function! s:init() abort
  command! Maze call denops#request('denops-maze', 'maze', [])
endfunction

augroup denops_maze
  autocmd!
  autocmd User DenopsPluginPost:denops-maze call s:init()
augroup END
tip
The Maze command is defined once the plugin is loaded with the above code.
If you wish to define the command immediately after Vim startup, you can
define the command and use denops#plugin#wait() or
denops#plugin#wait_async() in the function to wait for plugin load, like
this:
if exists('g:loaded_denops_maze')
  finish
endif
let g:loaded_denops_maze = 1

function! s:maze() abort
  if denops#plugin#wait('denops-maze')
     " Something went wrong
     return
  endif
  call denops#request('denops-maze', 'maze', [])
endfunction

command! Maze call s:maze()
Don't forget to activate the plugin by adding the following line to your
vimrc:
set runtimepath+=~/denops-maze
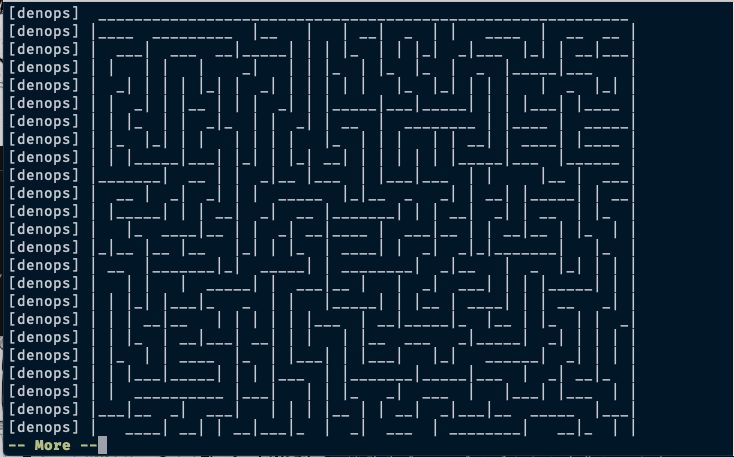
Then, restart Vim and execute :Maze to see the generated maze. Note that it
may take a few seconds for the first startup because Deno will download the
dependencies, but it happens only once.
Outputting Content to a Buffer
In the previous section, we echoed the maze to the echo area. However, echoing the maze to the echo area is not very practical. In this section, we will output the maze to a buffer so that users can yank the maze with daily Vim operations!
Let's modify the code to make the generated maze output to a buffer.
import type { Entrypoint } from "@denops/std";
import { Maze } from "maze_generator";

export const main: Entrypoint = (denops) => {
  denops.dispatcher = {
    async maze() {
      const maze = new Maze({}).generate();
      const content = maze.getString();
      await denops.cmd("enew");
      await denops.call("setline", 1, content.split(/\r?\n/g));
    },
  };
};
In this code, denops.cmd executes the Vim command enew to open a new buffer
in the current window. Then, denops.call calls the Vim function setline() to
write the maze to the buffer.
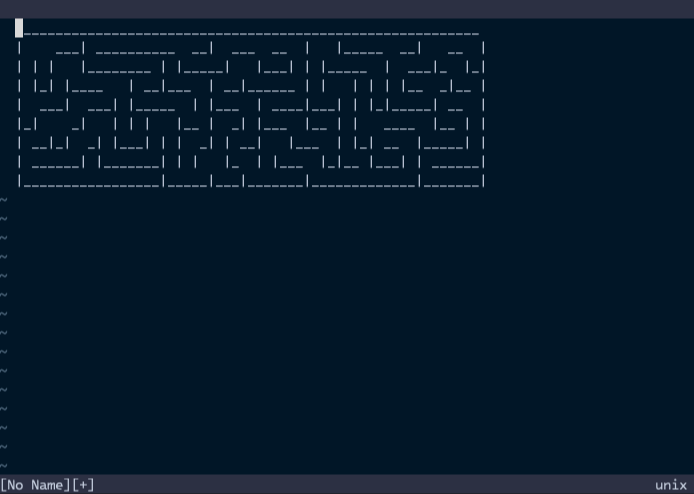
Restart Vim, rerun the Maze command, and then you can see:

Adjusting Maze Size to Fit the Window
In the previous section, we outputted the maze to a buffer. However, the maze size can sometimes be too large or too small for the window. It would be better to have a maze that fits the current window size.
Let's modify the plugin to ensure the generated maze fits the current window size.
import type { Entrypoint } from "@denops/std";
import * as fn from "@denops/std/function";
import { Maze } from "maze_generator";

export const main: Entrypoint = (denops) => {
  denops.dispatcher = {
    async maze() {
      await denops.cmd("enew");

      const winWidth = await fn.winwidth(denops, 0);
      const winHeight = await fn.winheight(denops, 0);
      const maze = new Maze({
        xSize: winWidth / 3,
        ySize: winHeight / 3,
      }).generate();
      const content = maze.getString();

      await fn.setline(denops, 1, content.split(/\r?\n/g));
    },
  };
};
In this code, we utilize the function module (aliased to fn) of
@denops/std (Denops Standard Library) to call winwidth(), winheight(), and
setline() functions. Then, we create a maze that fits the current window size
and write it to the buffer.
So why do we use the function module instead of denops.call? With
denops.call, developers must know the function name, arguments, return type,
and manually cast the return value to the expected type (like as string).
However, with the function module, developers can use auto-completion, type
checking, etc. It is more convenient and safe to use the function module.
tip
The function module of the @denops/std library provides a set of functions
that are available on both Vim and Neovim. If you'd like to use Vim or Neovim
only functions, use the vim or nvim module under the function module
instead.
See the function module of @denops/std API document for more details.
Restart Vim, rerun the :Maze command, and then you can see:
Properly Create a Virtual Buffer
Now that the maze is displayed in a buffer, but it is not properly configured.
For example, if a user executes the :edit command on the buffer, the maze will
disappear. This is because Vim does not know how to reload the buffer content,
and we must inform Vim about the content of the buffer when it is reloaded.
In this section, we will use the buffer module of @denops/std to create a
proper virtual buffer that concretizes the buffer content. Let's modify the
main.ts file as follows:
import type { Entrypoint } from "@denops/std";
import * as buffer from "@denops/std/buffer";
import * as fn from "@denops/std/function";
import { Maze } from "maze_generator";

export const main: Entrypoint = (denops) => {
  denops.dispatcher = {
    async maze() {
      const { bufnr, winnr } = await buffer.open(denops, "maze://");

      const winWidth = await fn.winwidth(denops, winnr);
      const winHeight = await fn.winheight(denops, winnr);
      const maze = new Maze({
        xSize: winWidth / 3,
        ySize: winHeight / 3,
      }).generate();
      const content = maze.getString();

      await buffer.replace(denops, bufnr, content.split(/\r?\n/g));
      await buffer.concrete(denops, bufnr);
    },
  };
};
In this code, we use buffer.open to open a maze:// buffer and get the buffer
number (bufnr) and the window number (winnr). Because Denops works
asynchronously, the current buffer or window may be changed from what we
expected. That's why developers should use buffer.open to open a buffer and
save the buffer number and the window number for further operations.
Then, we call fn.winwidth and fn.winheight with the obtained window number
to get the window size. Again, the current window might be changed, so we should
use winnr to specify the window.
note
Vim may execute some events between RPC calls, so the current buffer or window really may be changed from what we expected. Denops plugin developers should be careful about this. The best practice for avoiding this problem is to avoid using current and always specify the buffer number or window number.
After that, we use buffer.replace to replace the content of the buffer.
Actually, replacing the buffer content is a bit tricky. Developers should care
about modifiable options to avoid unmodifiable errors, foldmethod options to
keep foldings, and should remove the buffer content that is not replaced by
setline or setbufline, etc. The buffer.replace function will care about
all of those, so developers should avoid using setline or setbufline
directly.
At the end, we call buffer.concrete to concretize the buffer content. This
function defines BufReadCmd autocmd to restore the content when the buffer is
reloaded. Without this, the buffer content will be discarded when the user
executes the :edit command.
Restart Vim, rerun the :Maze command, and then you can see:

Try the :edit command on the buffer, and you can see the maze is still there.
Properly Configure the Buffer
In the previous section, we didn't configure the buffer options, so the buffer
remains modifiable and persists after being closed. In this section, we will
configure the buffer options to make the buffer non-modifiable and remove the
buffer after closure. Open the main.ts file and modify the maze method as
follows:
import type { Entrypoint } from "@denops/std";
import * as buffer from "@denops/std/buffer";
import * as fn from "@denops/std/function";
import * as op from "@denops/std/option";
import { Maze } from "maze_generator";

export const main: Entrypoint = (denops) => {
  denops.dispatcher = {
    async maze() {
      const { bufnr, winnr } = await buffer.open(denops, "maze://");

      const winWidth = await fn.winwidth(denops, winnr);
      const winHeight = await fn.winheight(denops, winnr);
      const maze = new Maze({
        xSize: winWidth / 3,
        ySize: winHeight / 3,
      }).generate();
      const content = maze.getString();

      await buffer.replace(denops, bufnr, content.split(/\r?\n/g));
      await buffer.concrete(denops, bufnr);

      await op.bufhidden.setLocal(denops, "wipe");
      await op.modifiable.setLocal(denops, false);
    },
  };
};
In this code, we use op.bufhidden.setLocal to set the bufhidden option to
wipe so that the buffer is wiped out when it is closed. Additionally, we use
op.modifiable.setLocal to set the modifiable option to false to make the
buffer non-modifiable. Note that since we use buffer.replace to replace the
content of the buffer, there is no need to explicitly set the modifiable
option to true before replacing the content.
Restart Vim, rerun the :Maze command, and confirm that the buffer is not
modifiable.
Reducing the Number of RPC Calls
As Denops employs RPC to interact with Vim, the volume of RPC calls
significantly influences the plugin's performance. In this section, we aim to
enhance performance by reducing the number of RPC calls using the batch module
from @denops/std. Let's revise the main.ts file as follows:
import type { Entrypoint } from "@denops/std";
import { batch, collect } from "@denops/std/batch";
import * as buffer from "@denops/std/buffer";
import * as fn from "@denops/std/function";
import * as op from "@denops/std/option";
import { Maze } from "maze_generator";

export const main: Entrypoint = (denops) => {
  denops.dispatcher = {
    async maze() {
      const { bufnr, winnr } = await buffer.open(denops, "maze://");

      const [winWidth, winHeight] = await collect(denops, (denops) => [
        fn.winwidth(denops, winnr),
        fn.winheight(denops, winnr),
      ]);
      const maze = new Maze({
        xSize: winWidth / 3,
        ySize: winHeight / 3,
      }).generate();
      const content = maze.getString();

      await batch(denops, async (denops) => {
        await buffer.replace(denops, bufnr, content.split(/\r?\n/g));
        await buffer.concrete(denops, bufnr);
        await op.bufhidden.setLocal(denops, "wipe");
        await op.modifiable.setLocal(denops, false);
      });
    },
  };
};
In this code, we use the collect function to gather window size values and the
batch function to execute multiple commands in a single RPC. This optimization
significantly reduces the number of RPC calls, thereby improving the plugin's
performance.
The collect function is designed for collecting multiple values in a single
RPC, offering the following features:
- Execution of
denops.callordenops.evalwithin thecollectis delayed and executed in a single RPC with the results. - The result of
denops.callordenops.evalin thecollectis always falsy, indicating that branching (if, switch, etc.) is not allowed. - Execution of
denops.redrawordenops.cmdin thecollectis not allowed. - Execution of
batchorcollectin thecollectis not allowed, indicating that nesting is not allowed.
In short, only the following operations are allowed in the collect:
denops.callordenops.evalthat returns a value.- Functions in the
functionmodule that return a value. - Functions in the
optionmodule that return a value. - Functions in the
variablemodule that return a value.
The batch function is designed for executing multiple commands in a single
RPC, offering the following features:
- Execution of
denops.call,denops.cmd, ordenops.evalin thebatchis delayed and executed in a single RPC without the results. - The result of
denops.callordenops.evalin thebatchis always falsy, indicating that branching (if, switch, etc.) is not allowed. - Execution of
denops.redrawis accumulated and only executed once at the end of thebatch. - Execution of
batchin thebatchis allowed, indicating that nesting is allowed. - Execution of
collectin thebatchis not allowed, indicating that nesting is not allowed.
In short, only the following operations are allowed in the batch:
denops.call,denops.cmd, ordenops.eval(without the results).- Functions in the
functionmodule (without the results). - Functions in the
optionmodule (without the results). - Functions in the
variablemodule (without the results). - Functions in other modules that do not call
collectinternally.
In the previous code, the number of RPC calls was more than 7, but after using
batch and collect, the number of RPC calls is reduced to 3. Although this is
a small plugin, the performance improvement may not be noticeable. However, in a
larger plugin, the performance improvement will be significant.
Restart Vim, rerun the :Maze command, and confirm that the plugin works
properly with batch and collect.
Next Steps
In the next step, read API references or real-world plugins
- API reference
- lambdalisue/gin.vim
- vim-skk/skkeleton
- Shougo/ddu.vim
- Find one from the
vim-denopstopic
API Reference
There is a standard module @denops/std to develop denops plugins. It provides various functions to interact with Vim and Neovim and some shorthands to make it easier to write plugins.
You can find API references about the module by checking the Deno doc page:
https://jsr.io/@denops/std.
FAQ
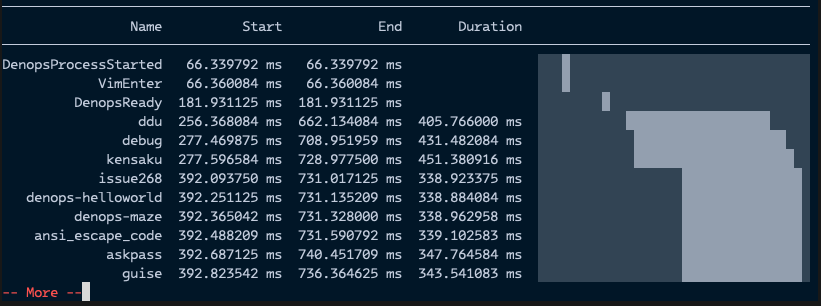
How to Check Denops Startup Time
To check the startup time of Denops or Denops plugins, utilize denops-startup-recorder. This plugin visualizes the timing of events related to Denops and Denops plugin startup.
It shows the result in echo area like:
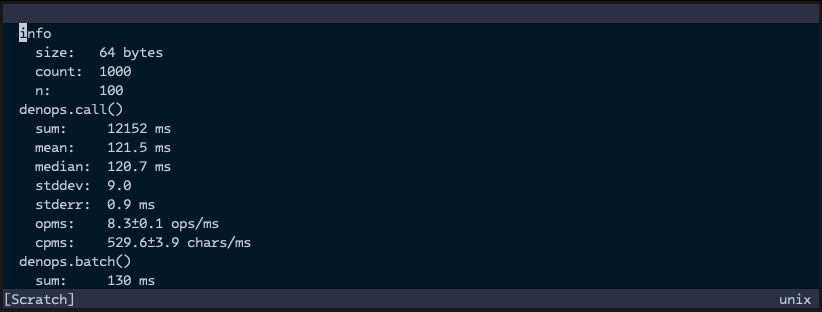
How to Check Denops Performance
To assess Denops performance, employ denops-benchmark. This plugin measures the number of operations or characters that can be processed in milliseconds.
It shows the result in a buffer like: